VOSS
VCAA Online Scoring System
Assessor User Guide
INTRODUCTION
The VCAA Online Scoring System (VOSS) is an online, secure web based interface which enables VCAA assessors to enter scores for external assessments, in particular VCE examinations, directly into the VCAA’s student administration database.
With the exception of security patches or where directed by the VCAA to resolve problems during marking, we recommend you keep a stable computer environment and don’t make changes to hardware or software during the marking period. Software companies will release updates globally which may impact your computer’s ability to access VOSS.
VOSS requires the following computer configuration (as at the start of October, 2015): OPERATING SYSTEM / INTERNET BROWSER
VOSS previously used the Silverlight plugin which need to be installed on your PC. In 2017, we have replaced the Silverlight functionality so you no longer require this plugin to be installed. This may mean that some functionality is slightly different than in previous years.
The new version of VOSS has been re-tested with the following operating systems and browsers:
- Windows 8.1 using Internet Explorer 11, Chrome 58 or Firefox 53
- Windows 10 using Internet Explorer 11, Chrome 58 or Firefox 53
- Macintosh Sierra 10.12.5 using Safari 10.1.1, Chrome 58 or Firefox 53
USB PORT
Your computer must have a USB2 port available for the Yubikey. The Yubikey is a 2nd factor authentication device required for logging into VOSS outside the VCAA network.
SCREEN RESOLUTIONThe recommended minimum screen resolution is 1024 x 768.
VCAA VOSS HelpdeskIf you require assistance with accessing or using VOSS you can contact the VCAA VOSS Helpdesk on 1800 820 122 or via email on vcaa.assessment.operations@edumail.vic.gov.au - please include your contact details in the email. VCAA VOSS Helpdesk hours will be communicated to assessors (via email) closer to the assessment period for each external assessment.
ACCESSING VOSS
To access VOSS:
- Log into the internet browser
- Enter the URL https://www.voss.vic.edu.au.
If you are marking at the VCAA Assessment Centre, you will be connected through VCAA network and presented with the following login page (Figure 1).
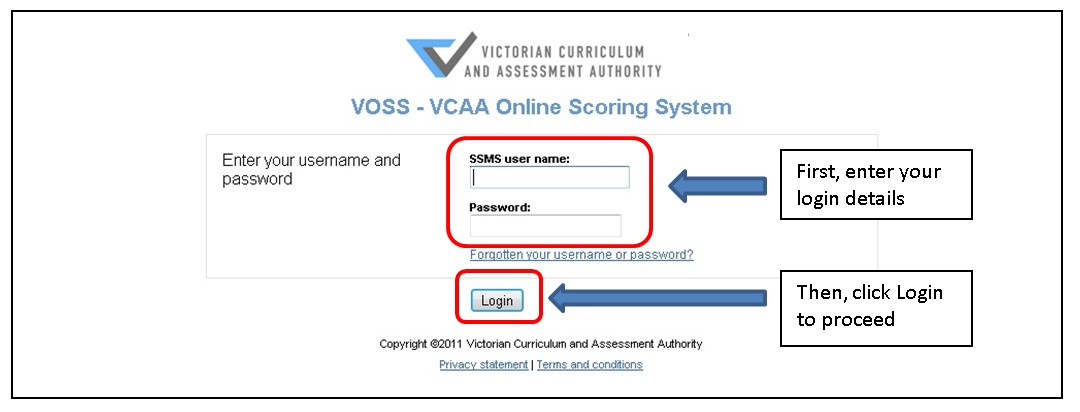 Figure 1: VOSS Login page (from within the VCAA network)
To log into VOSS (from within the VCAA network), please enter the following information:
- SSMS user name (not case sensitive)
- SSMS password
Please refer to Section 3. LOGIN ISSUES if you have forgotten your SSMS username or password.
Click on the ‘Login’ button. You will then be presented with the Terms and Conditions page (Figure 2), please read the information the first term you see this page then click the ‘Accept terms and conditions and launch VOSS’ button to proceed.
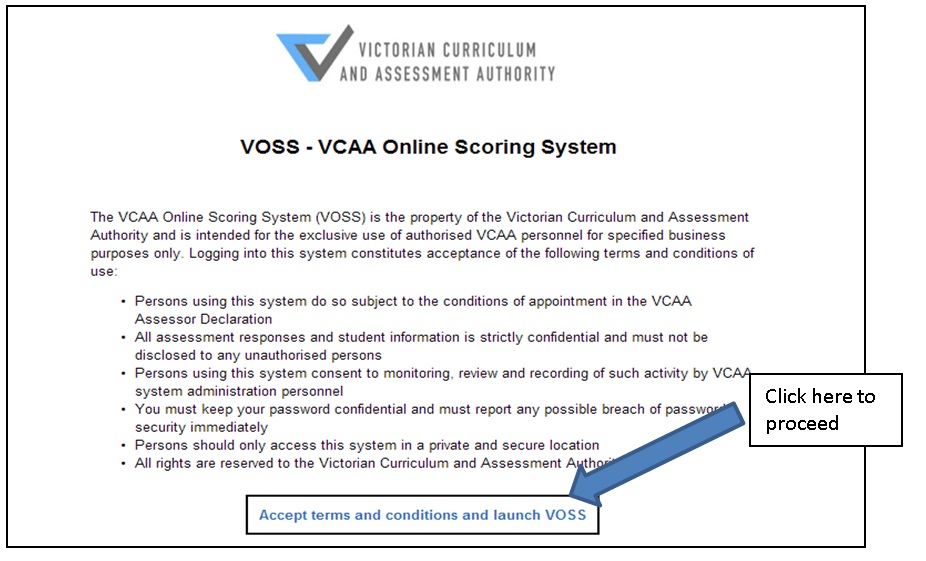 Figure 2: VOSS Terms and Conditions page
LOGGING IN FROM OUTSIDE THE VCAA NETWORK
Figure 2: VOSS Terms and Conditions page
LOGGING IN FROM OUTSIDE THE VCAA NETWORK
If you are marking outside of the VCAA Assessment Centre and VCAA network, you will be presented with the following login page (Figure 3).
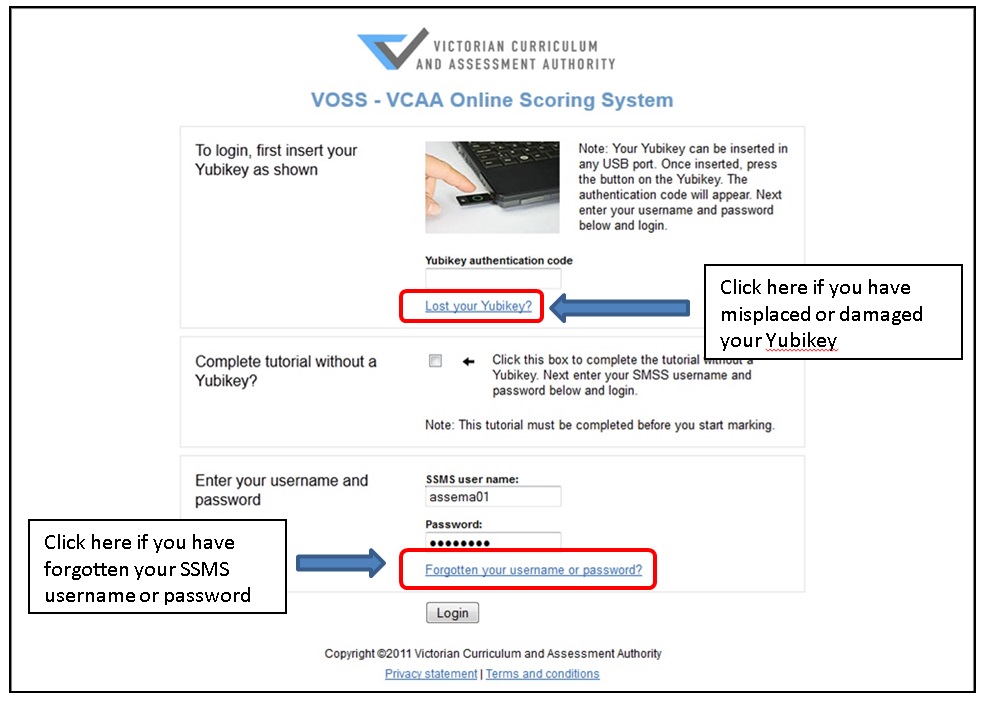 Figure 3: VOSS Login Page (outside the VCAA network)
In addition to your SSMS user name and password, assessors are required to use a Yubikey each time you log into VOSS outside the VCAA network. A Yubikey is a physical authentication device that needs to be inserted into any USB port of a computer. It is a mandatory additional authentication security feature when accessing VOSS externally. Yubikeys are assigned specifically to an individual assessor and are therefore not transferrable between assessors.
You will be distributed with your Yubikey at the Assessor Training Meeting.
If you misplace or damage your Yubikey, please click on the ‘Lost your Yubikey?’ link (Figure 3) and follow the instructions.
Please follow the following steps to log into VOSS from outside the VCAA network:
- Insert your Yubikey in any USB port of the computer. If it is the first time you have used your Yubikey with this computer there may be a slight delay while the appropriate drivers are installed for the first time.
-
When the light in the centre of the gold circular button on the Yubikey is green, this means that the appropriate drivers are installed and the Yubikey is ready for use (Figure 4).
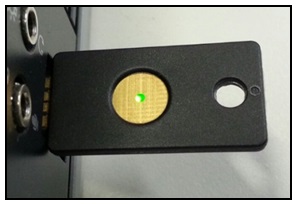 Figure 4: Your Yubikey is ready for use
-
Click the box under ‘Yubikey authentication code’, then press the gold circular button on your Yubikey. A security string of up to 32 characters should appear in the Yubikey authentication code field.
Note: You can complete the VOSS tutorial prior to your training meeting without a Yubikey by ticking the checkbox next to ‘Complete tutorial without a Yubikey?’.
This option will always be displayed on the VOSS login page. You should always leave this box unticked once you have completed the tutorial.
- Enter your SSMS user name (not case sensitive).
- Enter your SSMS password (case sensitive)
- 6. Click on the ‘Login’ button. You will then be presented with the Terms and Conditions page (Figure 2), please read the information the first term you see this page then click the ‘Accept terms and conditions and launch VOSS’ button to proceed.
LOGIN ISSUES
If you have forgotten your SSMS username or password, click on the ‘Forgotten your username or password?’ link on the VOSS login page (Figure 3). This will then bring you to the SSMS home page (Figure 5) where you can attempt to retrieve your username or password.
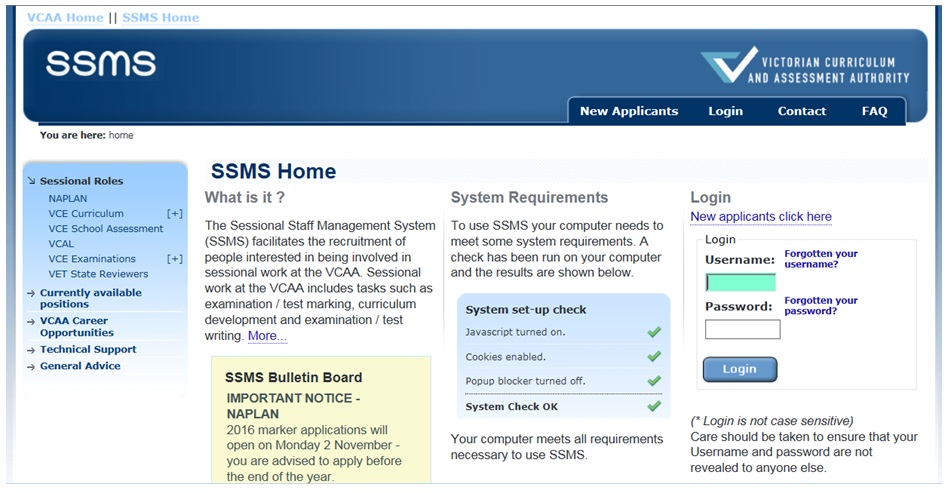 Figure 5: SSMS Home page
IF YOU HAVE FORGOTTEN YOUR USERNAME
Figure 5: SSMS Home page
IF YOU HAVE FORGOTTEN YOUR USERNAME
Click on the ‘Forgotten your username?’ link on the right of the SSMS home page (Figure 6) then follow the prompts to retrieve your username (Figure 7).
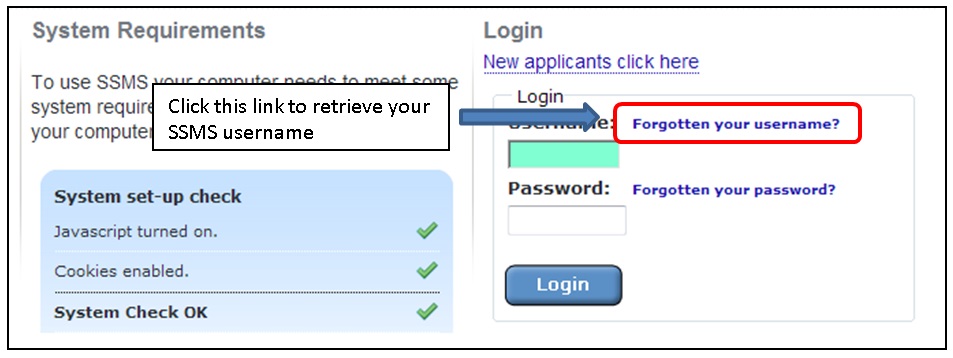 Figure 6: 'Forgotten your username?' link
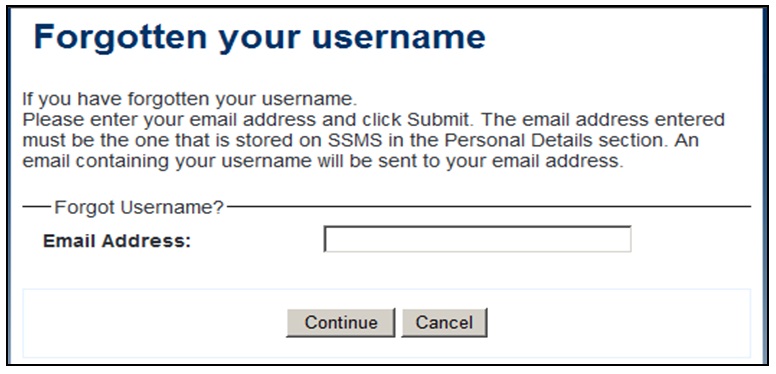 Figure 7: Forgotten your username screen and instructions
IN YOU HAVE FORGOTTEN YOUR PASSWORD
Figure 7: Forgotten your username screen and instructions
IN YOU HAVE FORGOTTEN YOUR PASSWORD
Click on the ‘Forgotten your password?’ link on the right of the SSMS home page (Figure 8) then follow the prompts to retrieve your password (Figure 9).
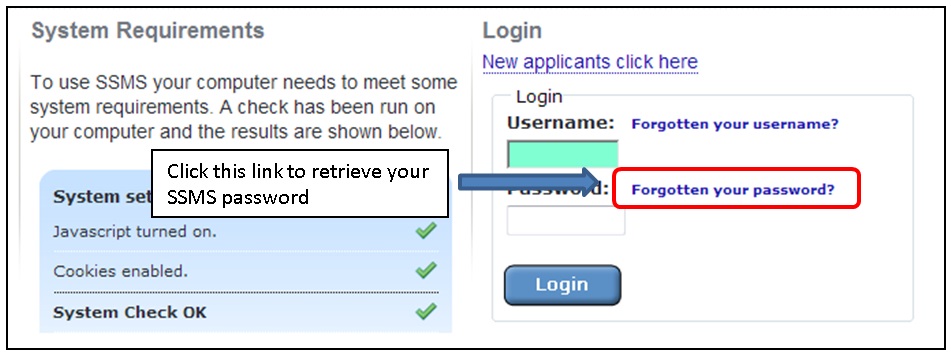 Figure 8: 'Forgotten your password?' link
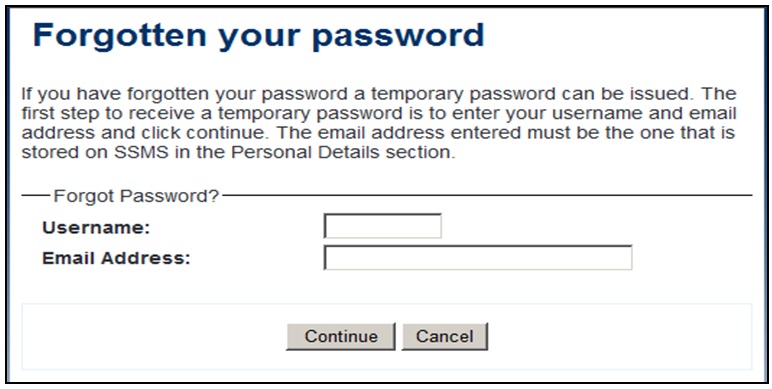 Figure 9: Forgotten your password screen and instructions
VOSS TUTORIAL
Before you can begin marking on VOSS for the first time, you are required to complete a short tutorial which will run you through the key features and functionality of VOSS (Figure 10).
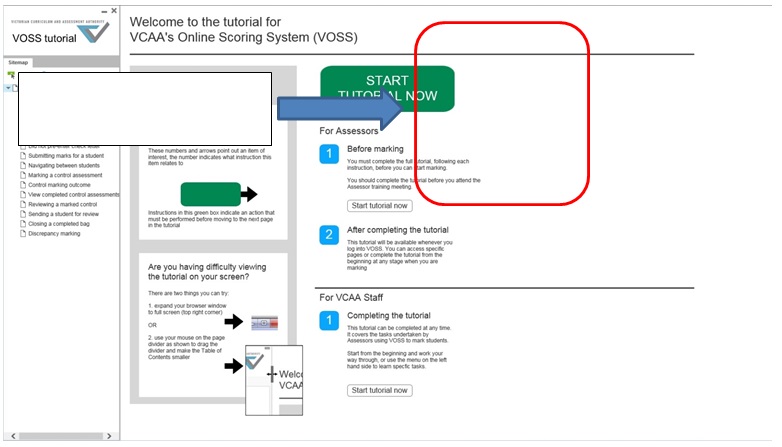 Figure 10: VOSS tutorial home page
Follow the on screen instructions through each stage to complete the VOSS tutorial. On the very last page of the tutorial, you will see a big green YES button at the bottom of the screen (Figure 11).
You MUST click this YES button in order to complete the tutorial – if you exit or close this page without clicking the green YES button the system will not recognise that you have completed the tutorial and you will not be allowed to commence marking.
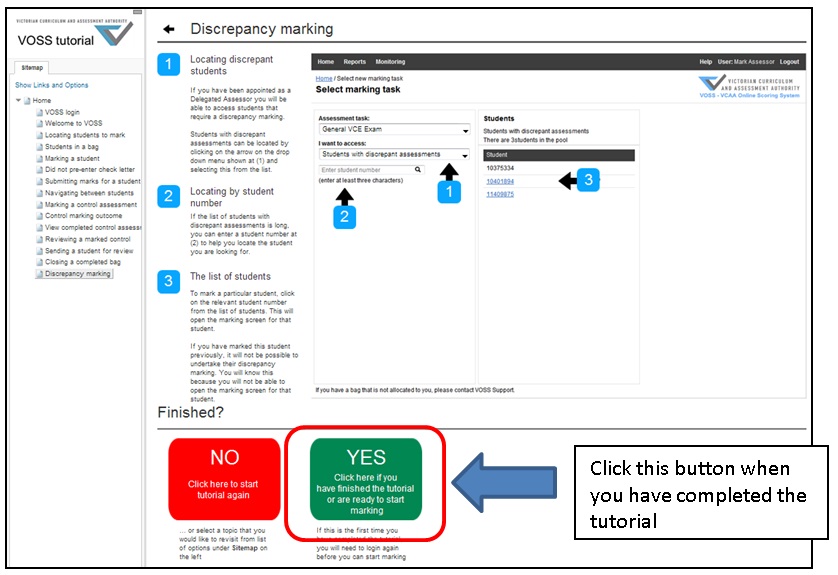 Figure 11: Click the YES button to complete the tutorial
You should complete your VOSS tutorial prior to your Assessor Training Meeting.
You can revisit any part of the tutorial during your marking. It can be accessed in full or by section from within VOSS on the right hand side of the VOSS home page (Figure 12).
VOSS HOME PAGE
Once successfully logged in, you can access the following functions from the VOSS home page (Figure 12):
- the Monitoring menu which allows you to go to the Control Script monitoring screen
- the assessment task(s) you are allowed to mark
- your last three completed Control Scripts
Note. This menu will only display once you have completed at least one Control Script. - any message(s) sent to you by your Chief Assessor
- links to each section of the VOSS tutorial
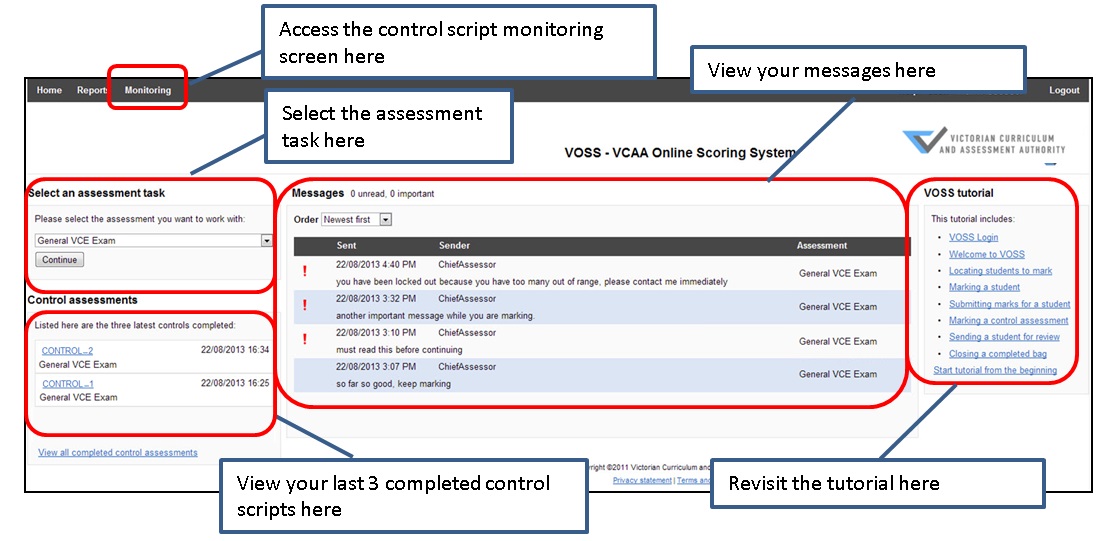 Figure 12: VOSS Home page
You can return to the VOSS home page by clicking the ‘Home’ link In the top left hand corner of any VOSS pages.
VIEWING MESSAGESDuring the marking process, your Chief Assessor or the VCAA may send you messages via VOSS. If a message is marked as important, you must read the message before you can continue marking. Important messages are annotated with a red exclamation mark, unread messages are indicated with an asterisk (Figure 13).
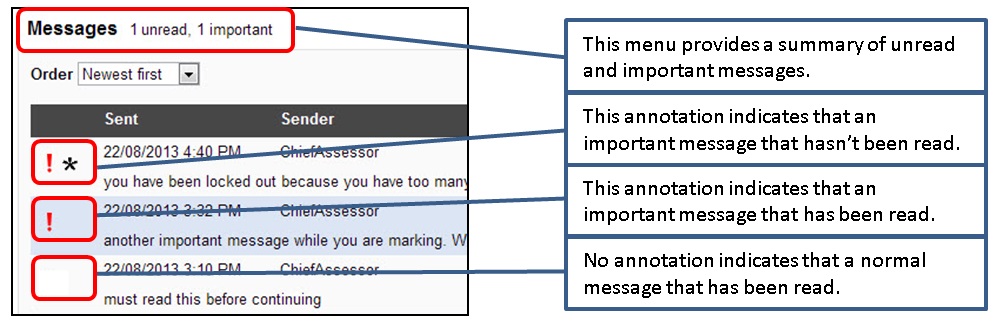 Figure 13: Messages panel in VOSS home page
If you have any ‘unread’ important messages, you will be prompted (Figure 14) to read the important message before you are allowed to continue marking in the VOSS marking screen.
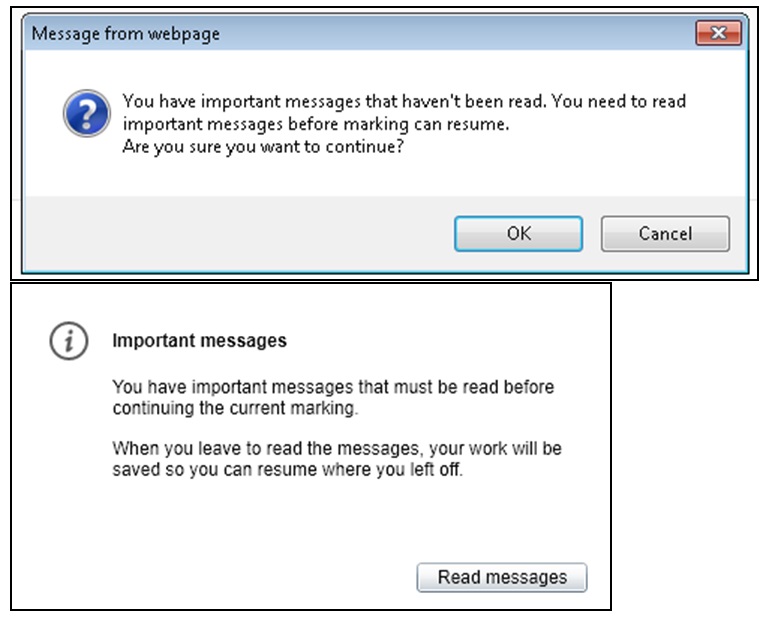 Figure 14: Important message prompts
Once you have read the important messages, VOSS will allow you to continue marking.
Note. The message prompts will appear slightly differently depending on where you are in VOSS at the time a message is sent.
BEGIN MARKING ON VOSS
When you are ready to mark, you can select your Assessment task from the ‘Select an assessment task’ drop down menu on the VOSS home page (Figure 12) and click ‘Continue’ to begin.
Note. Only the assessment tasks you have been appointed to mark will be available in the ‘Select an assessment task’ drop down menu.
You will then be directed to the Select marking task page (Figure 15).
For most assessors, your default selection under the ‘I want to access:’ drop down menu will be ‘Students in a bag allocated to me’. However, if you have been assigned as a Delegated Assessor, Discrepancy Assessor or Chief Assessor, you will have other options in this drop down menu to select from. These options will be discussed in more detail at assessment meetings at relevant marking stages.
In order to view your allocated bags, you will need to choose ‘Students in a bag allocated to me’ from the drop down menu.
MARKING A BAGAll bags allocated to you will be listed on the left hand side of the screen (Figure 15). It will also show you whether the bag is ‘Open’ or ‘Closed’, and the number of students that are submitted or partially marked in that bag.
For a bag that is ‘Open’, the bag number will be displayed in blue and hyperlinked (e.g. 2). click on the bag number to open up the marking screen (Figure 17).
If you have not previously submitted scores for any students in this bag, it will open up to the marking screen for the first student in the bag.
If you have previously submitted scores for students in this bag, it will open up at the marking screen for the next available student in the bag.
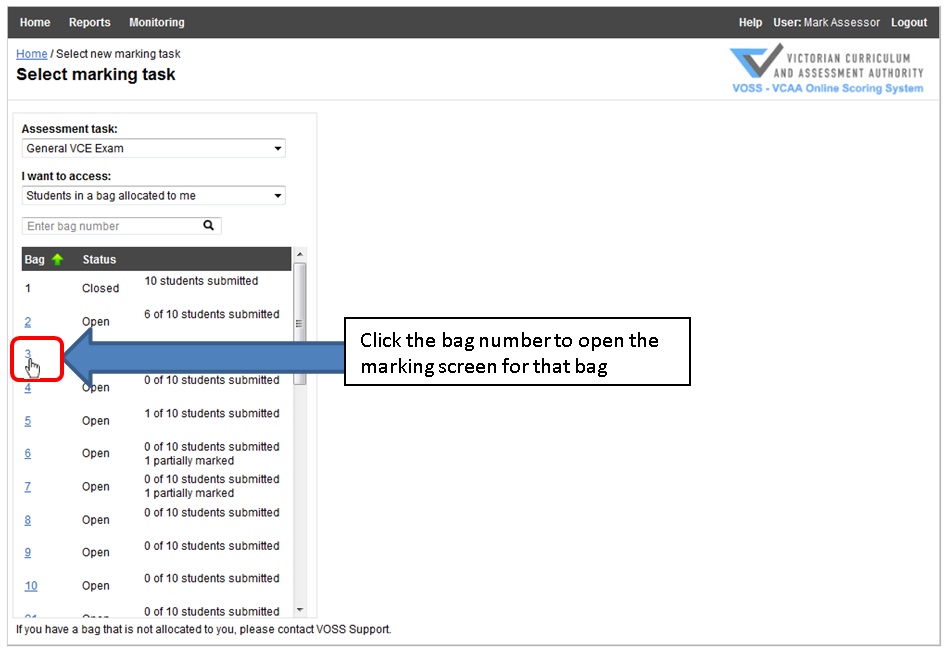 Figure 15: Selecting a bag from the Select marking task page
MARKING AN INDIVIDUAL STUDENT
Figure 15: Selecting a bag from the Select marking task page
MARKING AN INDIVIDUAL STUDENT
If you click anywhere on a bag row - to the right of the bag number – the row will become highlighted and the details of the specific students in the bag and their status will be displayed (see Figure 16).
Click on the appropriate student number hyperlink (e.g. 10205699 from the list of students to open the marking screen for that student.
 Figure 16: Selecting a student from a specific bag
THE MARKING SCREEN
The VOSS marking screen (Figure 17) is where you enter the scores for each question/criterion and submit them to the VCAA database. This screen contains the following information specific to the student response material you are assessing:
- Assessment task and component details
- Current bag number
- Your marking progress for this sessions and overall
- VCAA Student number
- Position of this student within this bag
- Marking status of the current assessment record
- Current component number you are marking for this student (only applicable to assessment tasks that have multiple components)
- Media files (audio, video or PDF) associated with this student (if applicable)
- Scoring grid
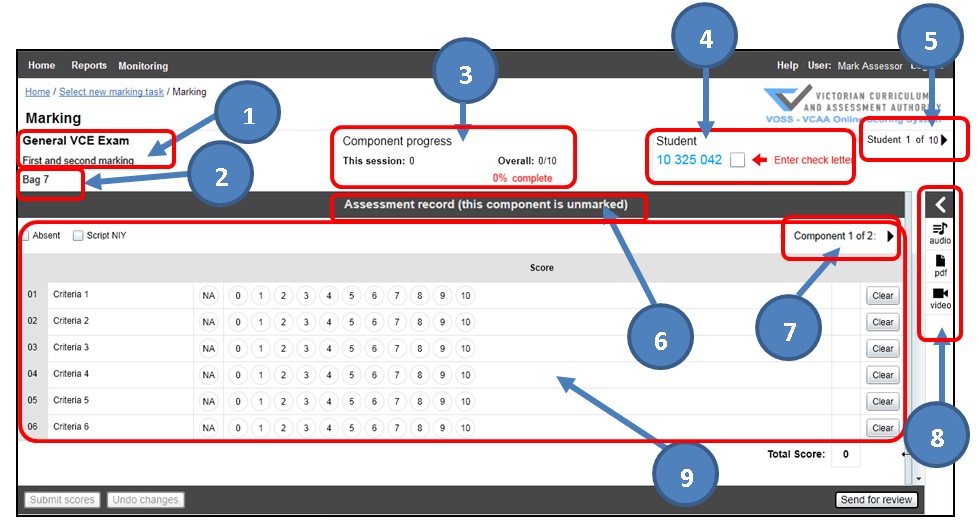 Figure 17: VOSS marking screen
SUBMITTING STUDENT SCORES
Figure 17: VOSS marking screen
SUBMITTING STUDENT SCORES
To start scoring you must first enter the check letter for this student on the top right of the screen (Figure 18).
 Figure 18: Enter student check letter.
It is critical that you match the first 8 numbers of the script you are marking with the 8 numbers displayed on the marking screen in front of you. You should then enter the check letter from the script into the check letter field on the marking screen. If the check letter you enter is incorrect, the following message will appear in red
‘Check letter does not match student, please try again’
Double check that the first 8 numbers of the script you are marking is the same as the student you have open in VOSS and then re-enter the check letter from the script.
VOSS only allows two unsuccessful attempts at validating the check letter.
If you enter the check letter incorrectly twice in a row you will be moved to the next available student in the bag.
Once you have entered the correct check letter, you can enter the scores for each question/criterion by clicking on the appropriate number in the scoring grid.
Where a student script is marked Absent (vertical lines down the middle of the front cover) or has been replaced by an Absent card, tick the ‘Absent’ box on the top left of the scoring grid.
Where a student script has been replaced by an NIY card (script ‘not in yet’), tick the ‘Script NIY’ box on the top left of the scoring grid (Figure 19).
Where a student has not attempted to answer a question, you should click the NA button for that question.
If you have accidentally clicked an incorrect score or wish to change an entry, you can click the ‘Clear’ button on the right hand side of the scoring grid to clear the score for that question. If you want to clear all the scores you have entered for the student, you can use the ‘Undo Changes’ button at the bottom of the screen (Figure 19).
Customising your screen displayYou can also drag the vertical slider bar on the right hand side of the marking screen (Figure 19) to customise the size of the scoring grid and bring the buttons closer together if preferred. Any adjustments you make will be retained for the next time you log into VOSS and utilise the marking screen.
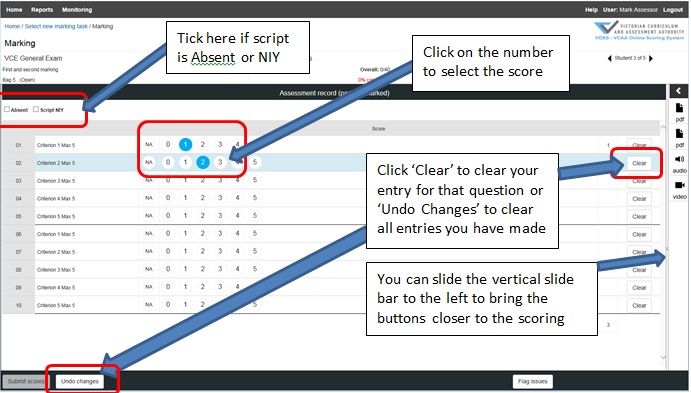 Figure 19: Marking a student on VOSS
Once you have entered scores for all questions, the ‘Submit scores’ button at the bottom of the screen will be enabled and you can click the ‘Submit scores’ button to submit the score for that student (Figure 19).
You can return to the student by clicking the navigation arrow on the top right of the screen ‘Student 1 of 10’ and you can move between components for a specific student as well if this assessment task has multiple components (Figure 20).
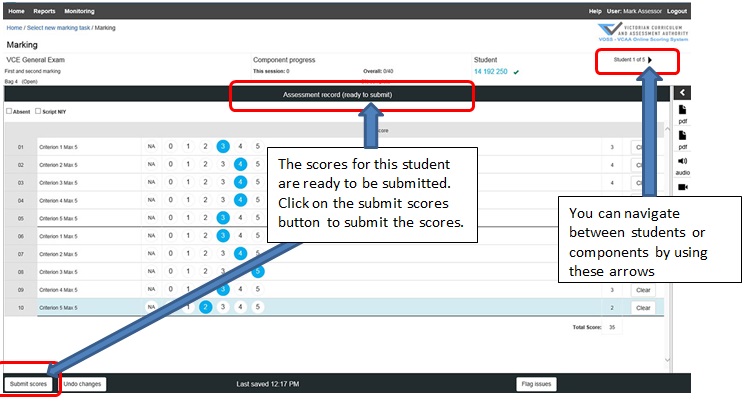 Figure 20: Submitting scores.
If you have entered scores for all questions and you attempt to move to the next student without submitting the scores, VOSS will prompt you to submit the scores before you can move on to the next student (Figure 21).
 Figure 21: Prompt for un-submitting scores when moving to another student
Note. VOSS does provide the flexibility to partially score a student, i.e., only enter scores for some of the required questions, and move between students without submitting scores.
Scores are AutoSaved every minute as they are entered. The last saved time is displayed in the bottom left hand of the marking screen (Figure 22).
 Figure 22: Last AutoSaved time
If your internet connection is lost while you are marking, a pop-up message will be displayed on the marking screen (Figure 23). The last saved time will be highlighted in red.
There is no point in continuing to score while your internet connection is lost as the scores will not be AutoSaved.
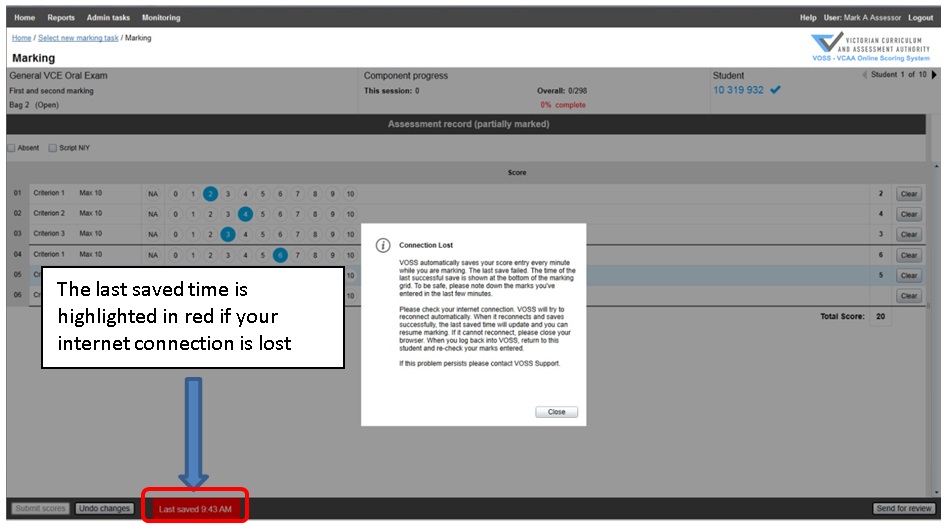 Figure 23: Connection Lost message during marking
If your internet connection is restored on its own, the Last saved time will no longer be highlighted in red, you can click the Close button on the connection lost message and continue marking. The AutoSave function will resume and update within one minute after the connection is restored.
Please remember, scores are not submitted to VCAA database for an individual student until you click the Submit Scores button.
It is highly recommend that you always complete the scoring for a single student and submit the scores before you move to the next student.
VIEWING ASSESSMENT FILESFor some assessment tasks, the VOSS marking screen will contain media files associated with the assessment on the right hand side of the screen (Figure 24).
They will be displayed as small icons as follows:
 |
-- audio files |  |
-- video files |  |
-- pdf files |
You can click on the arrow at the top of the icons or any of the icons to expand the assessment files list (Figure 24).
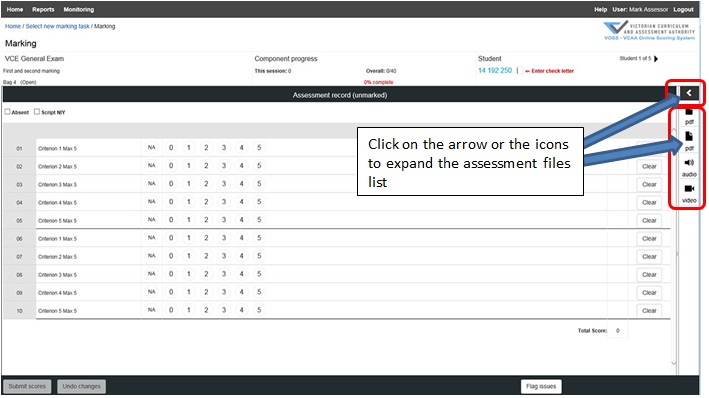 Figure 24: Expanding the assessment files list
Once the assessment files list is expanded, you will need to click on the smaller drop down arrow to play or view the file (Figure 25).
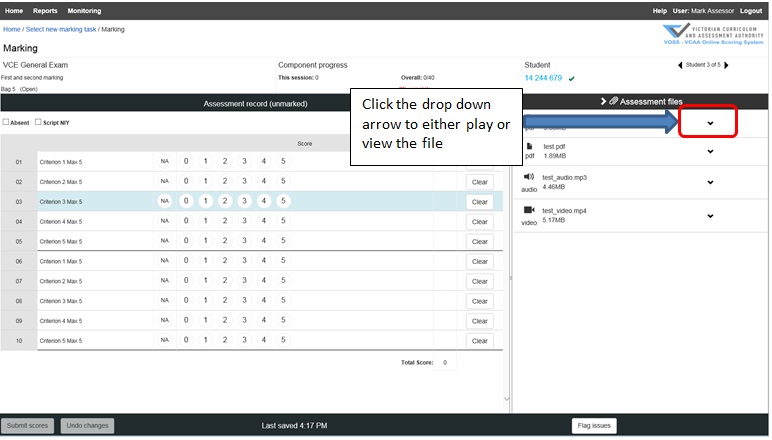 Figure 25: Expanded the assessment files list
Audio and video files will play automatically once you click the drop down arrow. For video files only you can click on the full screen icon to view the video in full screen (Figure 26).
For PDF files, you need to click the view button in order to open file (Figure 27). The file will be open within the VOSS marking screen.
You can drag the vertical slide bar in between the scoring grid and the file viewer to customize the viewing size of the file. If you need to view other files, click the ‘X’ button on the top right corner of the PDF viewer (Figure 28) to close the file and bring you back to the assessment files list.
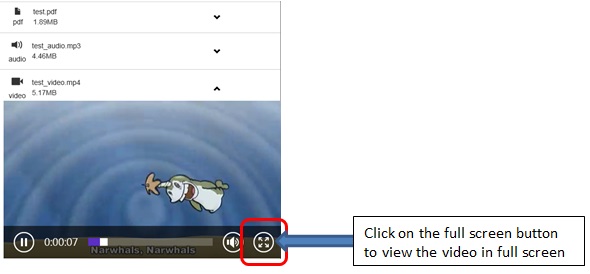 Figure 26: Viewing a video file in full screen mode
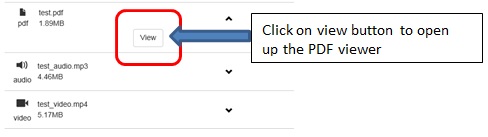 Figure 27: Viewing a PDF file
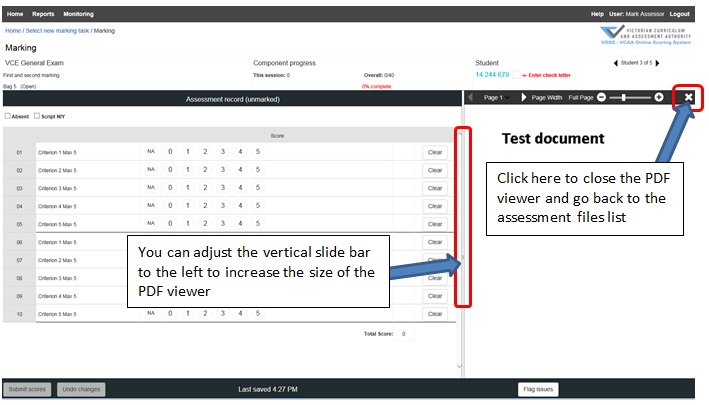 Figure 28: PDF file view in VOSS marking screen
SEND FOR REVIEW (or FLAG AN ISSUE)
Figure 28: PDF file view in VOSS marking screen
SEND FOR REVIEW (or FLAG AN ISSUE)
If you believe the Chief Assessor or VCAA need to be notified about a student response, you can do so by clicking on the ‘reviewFlag issues’ button on the VOSS marking screen (Figure 29) and select one or more of the following categories and enter comments (if required);
- Excellent response - student has provided an excellent response that you want to refer to the Chief Assessor
- Illegible response - you are unable to read the students response
- Possible connection to student - you recognise the student’s work. Please provide details.
- Student concern - there is evidence of student distress. Please provide details.
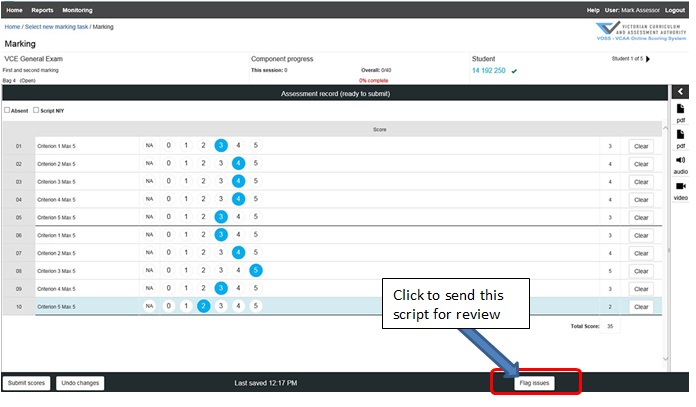 Figure 29: Flagging a student script for review
Once you are finished, click the Send button to flag the issues (Figure 30).
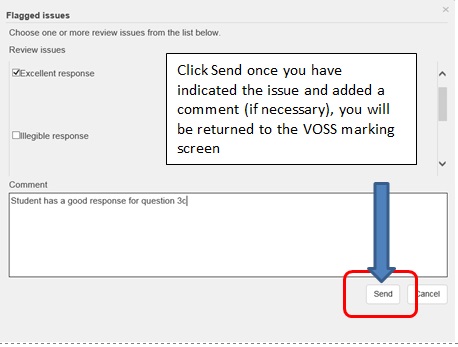 Figure 30: Send for review categories and Comment screen
Note you are still required to complete the marking for this student irrespective of the type of issue(s)
CONTROL (MONITORING) SCRIPTS
Once you commence marking on VOSS, you will be prompted to complete Control Scripts at various stages during the marking process. You will be prompted for a control script at designated intervals after submitting the scores for a student’s assessment.
You must complete the Control Script before you can continue marking the next available student.
When prompted, simply select the relevant control script from the available list and click continue (Figure 31). You will then be taken to the VOSS Control Script marking screen.
You don’t need to enter a check letter for a Control Script but it is still critical that you match the first 8 numbers of the Control Script you are marking with the 8 numbers displayed on the VOSS Control Script marking screen.
Click Submit scores button once you have finished scoring the control.
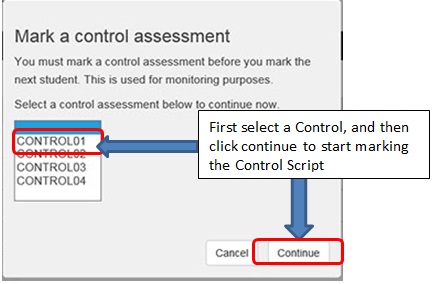 Figure 31: Prompt message to mark a control assessment
When you submit scores for a Control Script you will be informed immediately whether the overall score is within the acceptable range (Figure 32).
If you have scored outside the range, you will be asked to contact the Chief Assessor. You can continue marking once you have consulted your Chief Assessor. However, if you have score too many controls out of range, you will be deactivated from VOSS and will only be reactivated once the Chief Assessor is satisfied that you are marking as expected and in accordance with the Marking Guide.
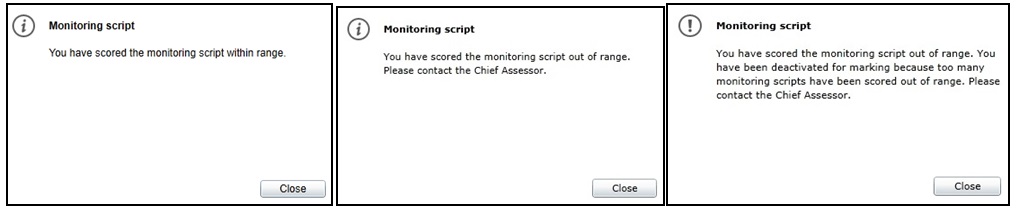 Figure 32: Message options you will receive after you have completed a Control Script
REVIEWING YOUR CONTROL SCRIPT SCORES
Figure 32: Message options you will receive after you have completed a Control Script
REVIEWING YOUR CONTROL SCRIPT SCORES
You can review your Control Script scores using the ‘Monitoring screen’ (Figure 33). This screen can be accessed on the VOSS Home page by either clicking on one of your completed Control Scripts in the Control Assessments panel or from the Monitoring menu on the top left of the page (Figure 12).
If you access this screen by selecting a specific control from the ‘Control Assessments’ panel it will display all details for that control immediately.
If you access the Monitoring screen via the ‘Monitoring’ menu then you need to select the relevant Assessment task and Control assessment from the drop down menus, then highlight the relevant Control assessment before you can view the scores you have entered. Scores cannot be changed in this screen.
Any Control Scripts that are out of range are highlighted with ![]() adjacent to the total score.
adjacent to the total score.
Some Control Scripts will have a tolerance range set for individual questions. If you are out of the tolerance range for an individual question, you will see ![]() adjacent to that question score.
adjacent to that question score.
This screen is particularly useful when discussing any control script issues with your Chief Assessor.
Note: Chief Assessors can see all completed Control Scripts for all assessors within their particular assessment task.
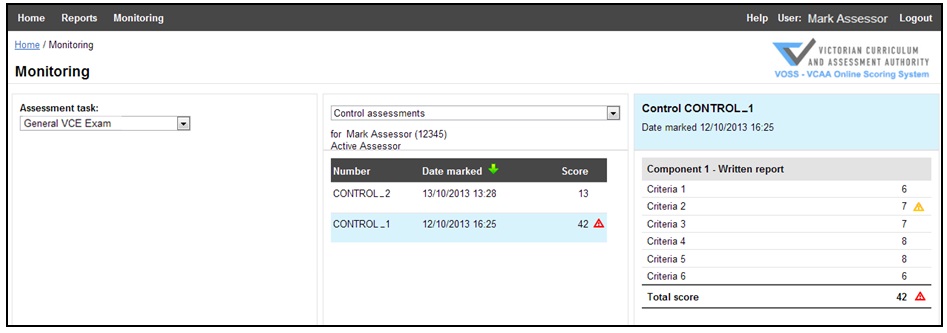 Figure 33: Monitoring screen - reviewing completed Control Script scores
CLOSING A BAG
When you have completed marking all students in a bag, you will be prompted to close the bag (Figure 34).
You will only be prompted to close a bag once you have submitted all the required scores for all the students in that bag.
You do not have to close the bag the first time you are prompted to close it.
Once you have closed a bag you will not be able to change any scores for any of the students within that bag. Therefore, you should only close the bag if you are sure that you do not need to make any changes to any of the scores you have submitted.
If you want to review the any of the student scores or make any adjustments before closing the bag, click Cancel to go back to the marking screen to check the student scores (Figure 34).
If you believe you have finished your bag but didn’t get a prompt to close the bag, you can go back to the ‘Select marking task’ page to check the status of a bag and/or which students haven’t been submitted (Figures 15 & 16).
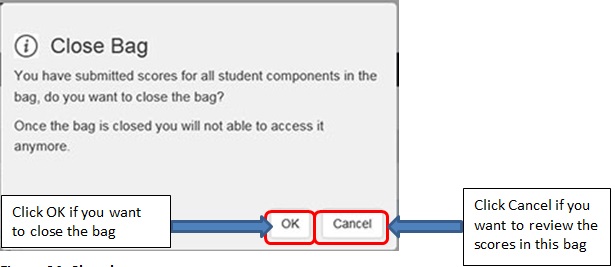 Figure 34: Close bag prompt
You can also close a bag by clicking on the Close bag button in the marking screen (Figure 35) or the ‘Select marking task ‘page when the student details for an individual bag have been selected (Figure 36).
 Figure 35: Close bag button in marking screen
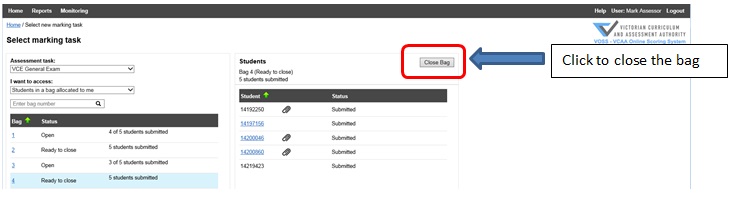 Figure 36: Close Bag button in Select marking task - Student detail view
VIEWING YOUR SUBMITTED SCORES
Figure 36: Close Bag button in Select marking task - Student detail view
VIEWING YOUR SUBMITTED SCORES
You can review any scores you have submitted for a student from the ‘Select marking task’ page (Figure 37) irrespective of whether a bag is closed or not.
If you click anywhere on a bag row - to the right of the bag number – the row will become highlighted and the details of the specific students in the bag and their status will be displayed. Click on the appropriate student number row and the scores you have submitted for this student will be displayed on the right of the screen.
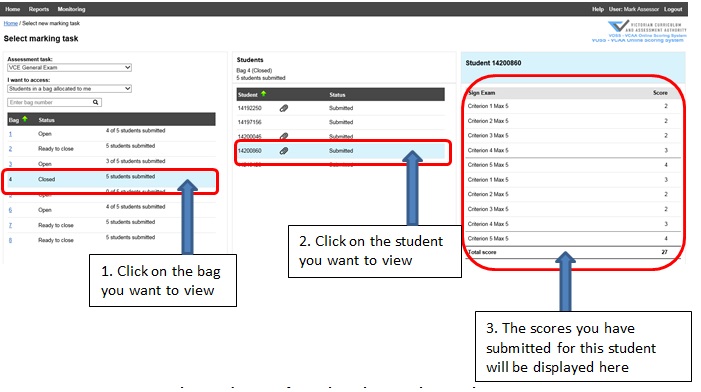 Figure 37: Viewing your submitted scores from the select marking task screen
Note. This is a view only screen. If you need to change the scores for any student assessment and you have not yet closed the bag then you will need to open that bag or select the student as outlined in the ‘MARKING AN INDIVIDUAL STUDENT’ section (Figure 16).
OCCUPATIONAL HEALTH AND SAFETY
Whether you are working form the VCAA Assessment Centre or working from home you should ensure that you set up your workstation correctly and that you regularly do some simple exercises. The following suggestions provide a few simple ways to reduce the risk of injury. The suggestions are taken from the Work Safe Victoria website at:
Setting up your work station SeatHeight: Adjust the chair height so feet are comfortably flat on the floor, thighs are approximately horizontal and the lower legs approximately vertical. Low heeled shoes will improve comfort of the legs with the chair at this height (Diagram 1).
Tilt seat (if available), set to horizontal or slightly forward to suit your comfort.
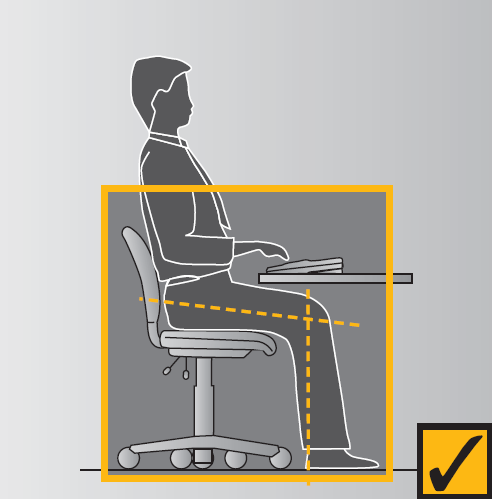 Diagram 1
Back Support
Diagram 1
Back Support
Raise the backrest to its maximum height. Then sit in the chair and check the fit of the backrest to the curve of your lower back. If it is not comfortable, lower the height by several centimetres and try this position. Repeat this adjustment and try each new position until the most comfortable fit is found. Ensure that the backrest supports the curve of your lower back and is not placed too low (Diagram 2).
Try to avoid sitting for long periods of time. Some form of break from sitting every 20 – 30 minutes is suggested. Even getting up for 20 to 30 seconds to go for a short walk will provide some relief.
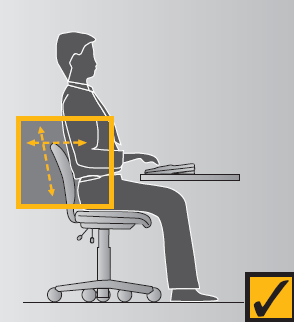 Diagram 2
Keyboard
Diagram 2
Keyboard
Tilt the keyboard using the feet at the back to suit your level of comfort. The common and preferred setting is where the feet are lowered so the keyboard sits flat on the desk. Place the keyboard as close to the front edge of the desk as is comfortable.
MousePlace the mouse mat directly beside the end of the keyboard on your preferred side. Use the mouse in this position and always aim to keep the mouse on the mat during use.
If you frequently use the mouse in your work you may wish to:
- learn to use it with both hands so that you can swap between the right and left sides for improved comfort
- where possible, try to avoid holding on to the mouse when not in use.
The screen should be positioned once the chair height has been established.
HeightThe screen should be positioned so that the top of the screen is level with or slightly lower than your eyes when you are sitting upright (Diagram 3).
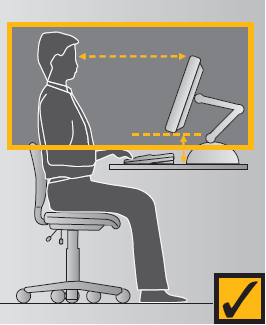 Diagram 3
Distance from the eye
Diagram 3
Distance from the eye
First place the screen so that it is approximately an arm’s length away from your usual seated position. Trial this position and if necessary move it further away or closer as required.
Positioning of the screenThe screen should be placed so that it does not face windows, catching reflections from the windows, or have a window directly behind it causing glare from the window.
Exercises Stop, get up and move!Walking around is the best exercise for providing a break from sitting, concentrating and using the muscles of the arms and hands. Every 20 to 30 minutes is an approximate guide to how often it is helpful to move around. Even standing up for 20 to 30 seconds to pick up papers from the photocopier or to get some water is a way to change your posture and give muscles a chance to recover.
S-t-r-e-t-c-h and check!Stretching exercises help to relax muscles which have been working and move those which have been in a fixed position. If possible, stand up to do your stretches. Do a few of these exercises a few times every day.
- In the diagram below, the dots show the muscles that you are exercising.
- Make sure you relax and perform exercises gently.
- Hold the stretch, or repeat as indicated on the diagram.
- Do not over-stretch.
- Stop if you feel discomfort when performing an action.
- Remember to exercise each side.
Keeping your chin tucked in, gently lower your ear to your shoulder and hold this position for ten seconds on either side. Repeat several times (Diagram 4.1).
Turn your head slowly to look over left shoulder. Turn head the other way. Repeat several times (Diagram 4.2).
Raise the head to straighten the neck. Tuck your chin in and upwards creating a double chin. This also results in a forward tilt of the head. Repeat several times (Diagram 4.3)
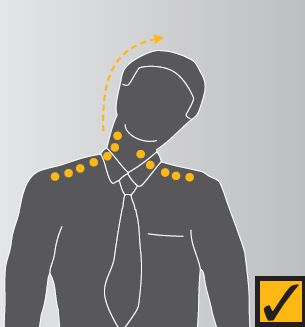 Diagram 4.1
|
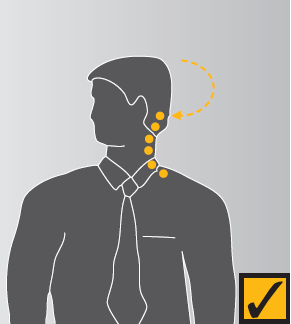 Diagram 4.2
|
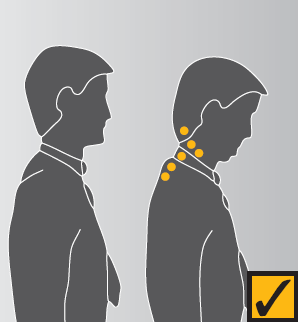 Diagram 4.3
|
Circle shoulders forward several times, then backwards. Repeat three to five times.
Check shoulder postureRelax your shoulders and rest your hands on your lap. Bend your elbows to no more than 90 degrees and check the height of your fingertips against your current work height. If the keyboard or desk is higher than your hands, you may be hunching your shoulders unnecessarily. If so, try and raise your chair height or lower your desk height and try and relax your shoulders while working (Diagram 5).
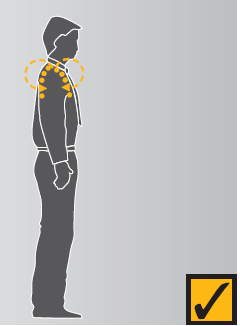 Diagram 5
Wrist, Arms, Legs
Wrist and elbow stretch
Diagram 5
Wrist, Arms, Legs
Wrist and elbow stretch
Interlace your fingers, palms outward, and straighten arms in front. Hold for ten seconds and repeat several times (Diagram 6.1).
Straighten your arm in front and bend your wrist forward, gently assist the stretch with your other hand. Hold for ten seconds, then stretch your wrist back and hold for ten seconds. Repeat this with your other arm (Diagram 6.2).
 Diagram 6.1
|
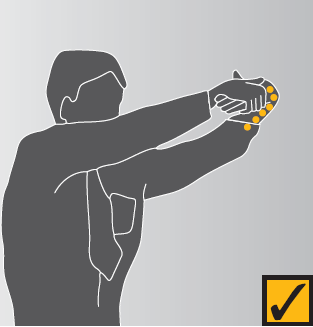 Diagram 6.2
|
- While keying, keep your wrist straight while your fingers are suspended over the keyboard.
- Keep your elbows at keyboard level. This may mean adjusting the desk or chair height.
- Do not rest your wrists on the desk or keyboard while using the keyboard. Keep your hands suspended.
- Rest your hands on the desk between periods of using the keyboard.
Interlace your fingers and turn your palms upwards above head. Straighten your arms then slowly lean slightly from side to side. Repeat movement several times (Diagram 7).
 Diagram 7
Back arching
Diagram 7
Back arching
Stand up. Support your lower back with your hands and gently arch back and hold for five to ten seconds. Repeat as often as necessary (Diagram 8).
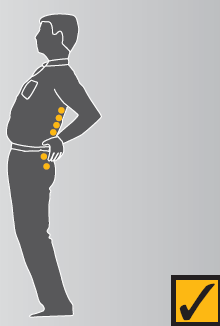 Diagram 8
Pectoral stretch
Diagram 8
Pectoral stretch
Raise both your arms to shoulder height and bend elbows. Pull both your elbows back slowly to bring your shoulder blades towards each other. Repeat several times (Diagram 9).
 Diagram 9
Check back support
Diagram 9
Check back support
- Sit well back in your chair.
- Adjust the backrest on your chair to support your lower back.
Stand up, holding the chair for balance if necessary, and alternately raise your heels and toes. Repeat ten times (Diagram 10).
Check leg comfort- If the seat of your chair is digging into the backs of your thighs, check that it is not too high or whether it is correctly titled backwards.
- If the seat is too high, lower the chair and desk or use a foot rest to support your feet.
- Check the tilt of the seat and, if necessary, adjust it to a horizontal position.
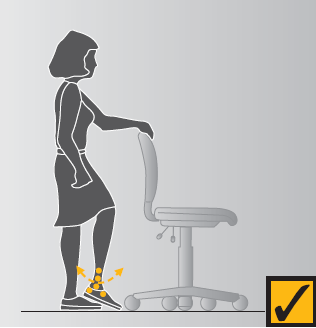 Diagram 10
Eyes
Eye Exercise
Diagram 10
Eyes
Eye Exercise
Sit up straight, face forward and repeat this sequence several times without moving your head. Look up, then down. Look left, look right (Diagram 11).
Visual RestLook up and away from the screen. Focus on a distant object (more than three meters away). For example, look out of the window or at a picture on a far wall. Shift your vision back to the screen and refocus (Diagram 12).
 Diagram 11
|
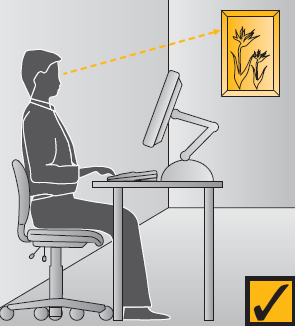 Diagram 12
|
- Is there enough light falling on your documents?
- Do windows or light fittings cause glare or reflection on the screen? If so, try turning the screen or blocking the path of the light.
- Use a screen with a light background when working with text. This is more comfortable for the eyes.